Have you ever dreamt of biting into a treat that explodes with the rich flavors of chocolate, creamy cheese, and crunchy cookies? Well, dream no more! Oreo Balls are here to turn your sweet fantasies into reality. These delightful bites are perfect for any occasion, but they truly shine during the festive season, adding a touch of whimsy and pure indulgence to your holiday cookie platter.
This recipe is a comprehensive guide to crafting the perfect Oreo Balls. We’ll delve into the history of this decadent dessert, explore the tools you’ll need, and provide detailed instructions with helpful tips to ensure success. We’ll also address common mistakes and answer frequently asked questions to make your Oreo Ball journey smooth sailing. So, are you ready to unleash your inner chocolatier? Let’s get started!
A History Steeped in Sweetness: The Origins of Oreo Balls
While the exact origin of Oreo Balls remains shrouded in mystery, their rise to fame likely coincides with the ever-growing popularity of Oreo cookies themselves. Oreos, invented in 1912, quickly captured the hearts (and stomachs) of people worldwide. It’s only natural that creative bakers would find ways to elevate this beloved cookie further.
Oreo Balls are a brilliant example of this culinary ingenuity. By combining crushed Oreos with creamy cheese and decadent chocolate, these treats offer a delightful textural and flavor contrast that’s simply irresistible.
All You Need to Whip Up a Batch of Oreo Balls: Tools and Timing
The beauty of Oreo Balls lies in their simplicity. You don’t need a fancy kitchen setup to create these masterpieces. Here’s what you’ll need:
- Food Processor or Blender: This trusty tool will pulverize your Oreos into the perfect crumbly base.
- Large Bowl: You’ll need a spacious bowl to combine the Oreo crumbs with the cream cheese.
- Hand Mixer (Optional): While not essential, a hand mixer can make blending the mixture a breeze.
- Cookie Scoop (Optional): A cookie scoop helps ensure uniform ball sizes for consistent results.
- Forks: You’ll need forks to dip the Oreo Balls into the melted chocolate.
- Baking Sheet: A lined baking sheet will serve as a resting place for your freshly dipped Oreo Balls.
- Refrigerator or Freezer: Chilling the mixture firms it up, making it easier to roll into balls.
Time Commitment: It takes approximately 30 minutes to prepare Oreo Balls, with no cooking time involved. However, factor in an additional hour of chilling time for the mixture to set before rolling.
The Perfect Ingredients: A Detailed Breakdown with Substitutes
Here’s a breakdown of the ingredients you’ll need for this recipe, along with some substitution options:
For the Oreo Balls:
- 19.1 Ounces Oreo Cookies (1 Package): This is the star of the show! You can use any Oreo flavor you like. Classic Oreos work beautifully, but feel free to experiment with mint, red velvet, peanut butter, or even birthday cake flavored Oreos for a unique twist.
- 8 Ounces Cream Cheese (1 Brick): Use full-fat cream cheese at room temperature for the best results. Softened cream cheese blends more smoothly and creates a creamier texture in the final product. If your cream cheese is cold, simply microwave it on low power for a few seconds until softened. Avoid over-softening, as this can make the mixture difficult to handle. Vegan cream cheese can be used as a substitute for a dairy-free option.
For the Coating:
- 8 Ounces Semisweet Baking Chocolate (1 Package): High-quality semisweet chocolate creates a rich and decadent coating. You can use dark chocolate for a more intense flavor or milk chocolate for a sweeter option. Candy melts are also a viable substitute, offering a variety of colors and flavors to match your preference.
- 8 Ounces White Baking Chocolate (Optional): White chocolate adds a touch of sweetness and visual appeal. You can omit it entirely or use colored candy melts instead.
Crafting Culinary Delights: Step-by-Step Instructions for Perfect Oreo Balls
Now comes the fun part: creating your very own batch of Oreo Balls! Follow these detailed instructions for guaranteed success:
- Crush the Oreos: Divide your Oreos into two batches. Pulse the first 9 cookies in your food processor or blender until you achieve a fine crumb consistency. Set this aside in a bowl.
- Continue Crushing: Next, crush the remaining Oreos until they resemble a coarse crumb mixture.
- Creamy Perfection: In your large bowl, combine the finely crushed Oreos (from step 1) with the softened cream cheese. Using a hand mixer (or a sturdy spoon if you don’t have one), beat the mixture until well incorporated. There should be no visible streaks of cream cheese, and the mixture should achieve a uniform consistency.
- Chilling Out: This step is crucial! Cover the bowl with plastic wrap or a lid and place it in the refrigerator for at least 1 hour, or in the freezer for 20 minutes. Chilling firms up the mixture, making it easier to handle and roll into balls without crumbling.
- Shaping Up: Take out the chilled mixture and prepare a baking sheet lined with parchment paper. Using a cookie scoop (or a tablespoon for a more rustic look), scoop out even portions of the mixture. Gently roll each portion into a ball between your palms. Aim for a uniform size for consistent results when coating them in chocolate later.
- Chocolate Bath Time: While your Oreo balls are chilling, it’s time to melt the chocolate. Separate the semisweet and white chocolate (if using) into two microwave-safe bowls. Add a tablespoon of vegetable oil (or coconut oil for white chocolate) to each bowl to create a smoother consistency. Microwave each bowl on low power in 30-second intervals, stirring in between, until the chocolate is melted and completely smooth. Be careful not to overheat the chocolate, as it can seize and become unusable.
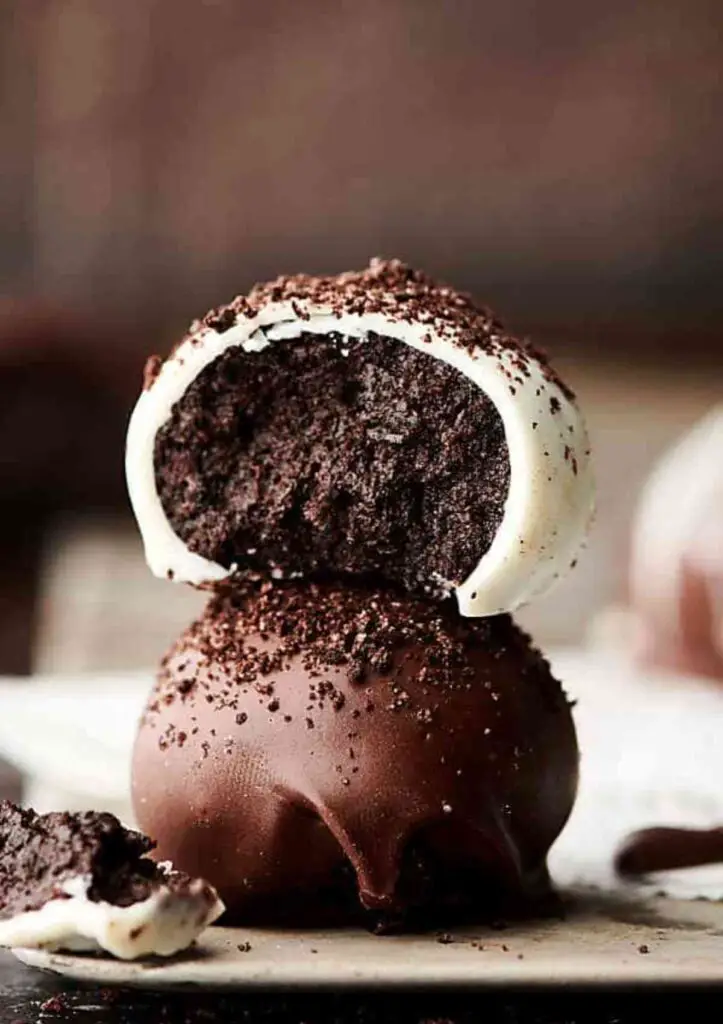
- Coating with Flair: Now for the fun part! Using a fork, dip each Oreo ball into your chosen melted chocolate, allowing excess to drip off. Tap the fork gently against the side of the bowl to remove any large drips. For a touch of variety, you can coat half the balls in semisweet chocolate and the other half in white chocolate.
- Sprinkle of Magic (Optional): While the chocolate is still wet, you can add some extra flair to your Oreo Balls. Dip them into the reserved coarsely crushed Oreos (from step 2) for a delightful textural contrast. You can also use sprinkles, chopped nuts, or even mini chocolate chips for additional embellishments.
- Setting the Stage: Carefully transfer the chocolate-coated Oreo Balls to the prepared baking sheet. Place the baking sheet in the refrigerator and let the Oreo Balls chill for at least 30 minutes, or until the chocolate is completely hardened.
- Serving Up Perfection: Once chilled, your Oreo Balls are ready to be enjoyed! You can store them in an airtight container in the refrigerator for up to a week, or freeze them for up to 2 months for long-lasting indulgence.
Top 5 Mistakes to Avoid and How to Conquer Them:
Even the most seasoned bakers can make mistakes. Here are the top 5 pitfalls to avoid when crafting your Oreo Balls, along with solutions to ensure sweet success:
- Over-mixing the Oreo Crumbs: While you want the Oreo crumbs and cream cheese to be well combined, avoid over-mixing. Over-mixing can result in a greasy texture in your final product. Pulse or mix until just incorporated.
- Skipping the Chilling Step: Chilling the mixture is essential for easy rolling and shaping. Don’t be tempted to skip this step, or you’ll end up with crumbly balls that are difficult to handle.
- Uneven Chocolate Coating: To achieve a smooth and even chocolate coating, ensure your chocolate is melted completely and reaches a pourable consistency. If the chocolate is too thick, it will be difficult to coat the Oreo Balls and may leave them clumpy.
- Using Hot Chocolate: Dipping your Oreo Balls into hot chocolate will cause the cream cheese mixture to soften and melt, making it difficult to achieve a clean coat. Make sure your chocolate is melted but cool to the touch before dipping.
- Storing Oreo Balls Uncovered: Leaving your Oreo Balls exposed to air can dry them out and affect their texture. Always store them in an airtight container in the refrigerator or freezer.
Frequently Asked Questions: Oreo Balls Demystified
Here are some of the most common questions people have about Oreo Balls, answered for a stress-free baking experience:
- Q: Can I use different flavored Oreos?
A: Absolutely! The beauty of Oreo Balls lies in their versatility. Experiment with various Oreo flavors like mint, red velvet, peanut butter, or even birthday cake to create unique and delightful treats. - Q: Do I need a food processor to make Oreo Balls?
A: Not necessarily! While a food processor offers the quickest and most consistent way to crush the Oreos, you can achieve similar results with a little elbow grease. Place the Oreos in a sturdy zip-lock bag and crush them with a rolling pin or a meat mallet. Be sure to crush them to a fine crumb consistency for the best texture in your Oreo Balls.
- Q: Can I use a spoon to roll the Oreo mixture into balls?
A: Absolutely! A cookie scoop is a convenient tool for portioning and shaping the Oreo mixture, but it’s not essential. You can use a tablespoon to scoop out even amounts and then gently roll them between your palms to form balls.
- Q: My Oreo Balls are too soft! What went wrong?
A: There are two possible culprits here. First, you might have over-mixed the Oreo crumbs and cream cheese mixture, resulting in a softer consistency. Secondly, the Oreo Balls might not have been chilled for long enough. Ensure you follow the chilling time as directed in the recipe for a firmer texture.
- Q: How can I melt chocolate without a microwave?
A: If you don’t have a microwave, you can melt your chocolate using a double boiler method. Fill a saucepan with a few inches of water and bring it to a simmer. Place a heat-resistant bowl on top of the saucepan, ensuring the bottom of the bowl doesn’t touch the water. Add the chocolate to the bowl and stir constantly until melted and smooth.
A Sweet Conclusion: The Allure of Oreo Balls
Oreo Balls are a delightful treat that is both easy to make and endlessly customizable. With their irresistible combination of creamy cheesecake, crunchy cookies, and decadent chocolate, they’re sure to be a crowd-pleaser at any gathering. So, the next time you’re looking for a fun and festive dessert project, look no further than these delightful Oreo Balls. With this detailed guide and a sprinkle of creativity, you’re well on your way to becoming an Oreo Ball baking champion!